Prerequisites
Make sure you're rocking our latest software version! If you're unsure whether your current setup supports it, just shoot a message over to our support team. They'll take a look, sort you out with any necessary updates, and get you up and running in no time!
What are the benifits?
Your company can enjoy several benefits when you use a recurring payment processing solution. Here are a few of them:
-
Minimized effort: The setup is a one-shot deal, and no more work needs to be done every billing cycle by either you or your customers. With online recurring payment processing, the invoice and payment information automatically flows into the right systems, preventing missed and late payments–making it easier to keep track of a client's payment history.
-
Error and fraud defense: There is less risk of card detail mistakes or fraud because your customers aren’t required to enter their payment details over and over again. Fraud and chargeback-related expenses make up 13-20% of businesses operating budgets. With automatic billing cycles, you can protect your business integrity by securing your client's payment methods and streamlining the billing process.
-
Flexible payment terms and packages: It’s easier to give your customers a variety of payment, plan, and billing frequency options, which they can change at any time. Some customers may want to make credit or debit card payments, while others want to pay using a virtual terminal like PayPal for automatic payments. Perhaps your value-packed but most expensive plan appeals to a small subset of your customers, but others see it as excessive and wish you had a pared-down offering. Without recurring payment options, this type of flexibility is difficult, if not impossible, to achieve.
Overview
In this manual, we'll walk you through the process of creating the plan, setting up the product, and configuring your webshop to enable your clients to subscribe hassle-free. Please keep in mind that subscriptions can only be sold through your online booking platform. In this tutorial, we will be making a monthly subscription of €10. Let's dive in!
Step 1: Create the subscription plan
Alright, let's break down the subscription setup! The subscription is the heart of it all—where your clients sign up for ongoing services. It's made up of a couple of key parts:
- Subscription Meta: This covers how often your clients get billed, like monthly or yearly.
- Subscription Lines: Here's where you set up the nitty-gritty of the payment plan. You can tweak things like the amount your clients pay each time and even offer special deals, like "Get a sweet discount for your first 4 months!"
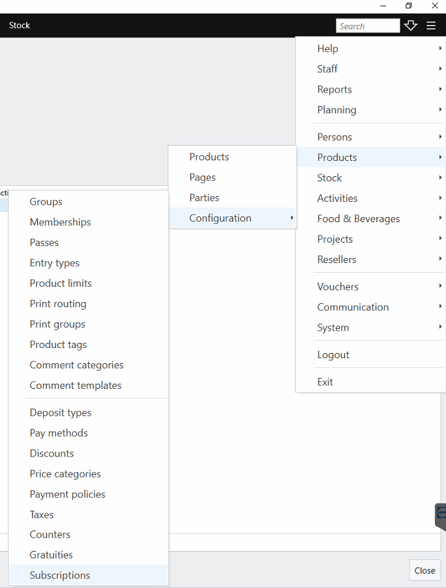
First things first: the subscription. Please navigate to the "Subscriptions" section in our software by going to:
- Menu
- Products
- Configuration
- Subscriptions
You will arrive in a complete empty environment, but no worries this will change soon once we have configured our first subsription!
Let's kickstart the creation of our first subscription! Click on the "+" button to begin. This action will reveal a new section on the right-hand side of the application. Here, you'll find various fields to configure:
- Name: Enter the name of the subscription.
- Price Description: Add any additional information about the pricing
- Cancellation policy: Add any additional information about the cancellation policy
- Retry Interval: Specify the interval for our system to retry processing recurring payments if there are any issues.
- Retry on Fail: Determine the number of attempts our system should make to charge the customer in case of a failed payment.
As previously mentioned, this tutorial will set up a subscription priced at €10 per month. Feel free to customize these values as per your requirements. For now, let's proceed with the following details:
- Name: €10 Monthly Subscription
- Price Description: Monthly subscription for clients
- Retry Interval: 24 hours
- Retry on Fail: 10 attempts
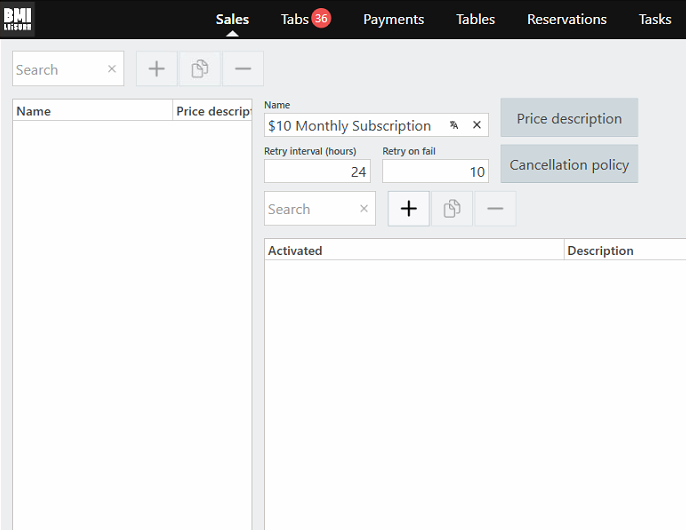
This configuration indicates that we're establishing a monthly subscription plan priced at €10, with a retry interval of 24 hours in case of any payment failure, allowing for up to 10 retry attempts.
Make sure to hit the "Apply" button to save these changes! :)
Awesome, we've nailed step one! Our subscription is configured. Now, let's dive into step two: creating the Subscription Meta.
Step 1.2: Create the Subscription Meta
Subscription Meta dictates the billing frequency for clients, whether it's on a monthly, yearly or any other basis.
To craft your Subscription Meta, simply hit the "+" button. A new window will appear, empty but ready for your input. This window provides a snapshot of all configured Subscription Metas for the selected Subscription.
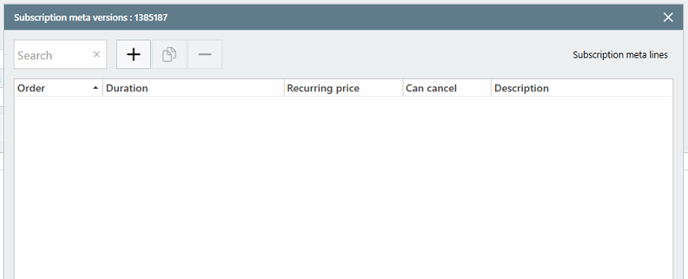
Step 1.3: Create the Subscription Meta Line
Within this window, you'll find another "+" button—click on that to create your Subscription Meta Line.
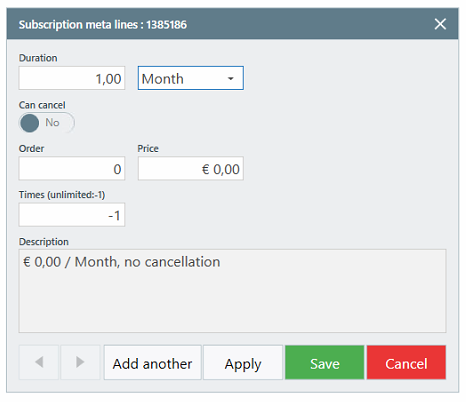
This will again reveal a new section where you'll find various fields to configure:
- Duration: After how many days/months/years the customer gets charged.
- Can cancel: Allows your customer to cancel the subscription while the Subscription Meta Line is ongoing.
- Order: The sequence of the Meta Line. This is important when you configure multiple Meta Lines as our software works from top to bottom.
- Price: The price that gets charged each interval
- Times: How many times this Meta Line should occur. -1 means continuously.
Example
The screenshot below shows you an example of a continuous subscription plan where the customer can cancel the subscription within the first three months.
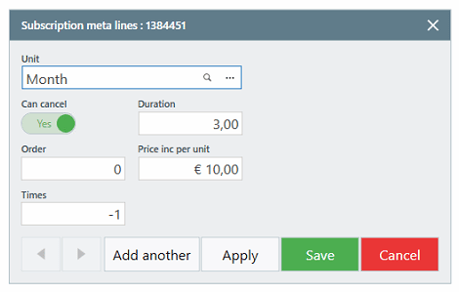
As outlined in the introduction of this manual, we're going to establish a basic subscription plan priced at €10, billing the customer monthly without interruption. For more advanced examples, please consult the "Example Cases" section located at the conclusion of this tutorial. The configuration looks like this.

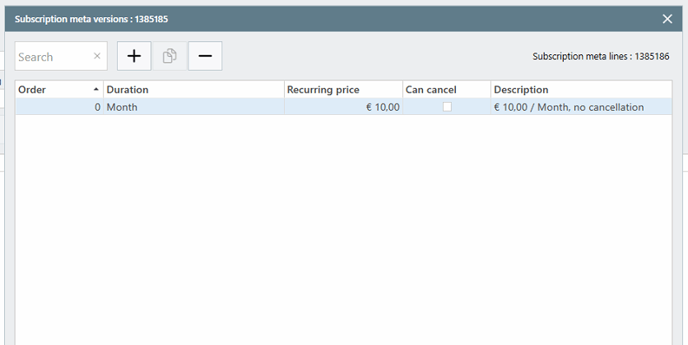
Once satisfied with the subscription line, we confirm our configuration by selecting "Save" and then carefully verifying our configuration in the Subscription Meta overview.
You have now succesfully created your very first Subscription Plan! Great job!
Example Case: Monthly subscription where the customer can cancel his/her subscription after 6 months.
To achieve this, we would need to create:
- One subscription plan
- One subscription meta
- Two subscription meta lines
The subscription plan and meta we already know how to create. The meta lines are easy to do. We would need:
- One line for the first 6 months where the customer cannot cancel his subscription
- One line for the months after where the customer can cancel his subscription
The end result will look like this.
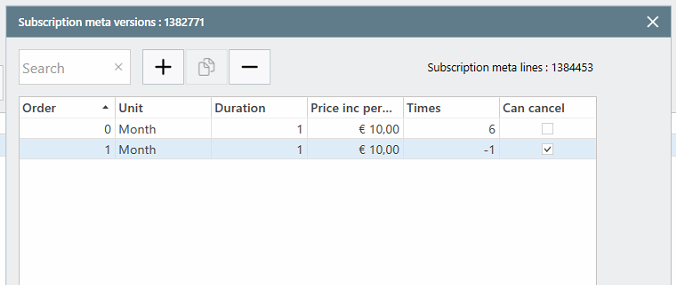
To summarize:
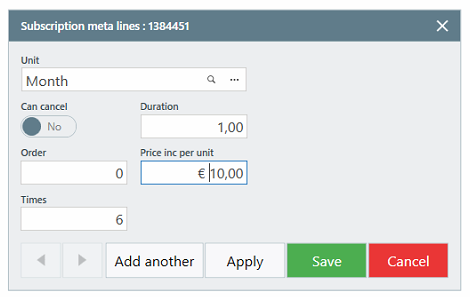
- The initial subscription line bills the customer €10 monthly for a duration of 6 months, with no option for cancellation. After this period, the subscription line expires.
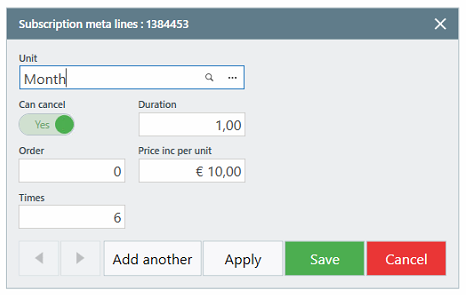
- The second subscription line entails a monthly charge of €10, with ongoing flexibility for the customer to cancel at any time.
Have a close look at the "order" configuration of both lines. As mentioned before this is important to double check as our system works from top to bottom. The subscription lines need to be in the correct sequence.
- Troubleshooting:
- Anticipate common issues users may encounter.
- Provide solutions or guidance on how to resolve these issues.
- Additional Tips:
- Offer extra tips or shortcuts that enhance the user's experience.
- Include best practices related to the task.
- Conclusion:
- Summarize the key points of the tutorial.
- Reinforce the benefits of completing the task or using the feature.
Next Steps:Provide guidance on what users can do next, such as exploring related features or accessing additional resources.
Feedback:Encourage users to provide feedback on the tutorial and offer contact information or a link to a feedback form.
Appendix:Include any supplementary information, such as glossary terms, related links, or FAQs.
Version History:Document the version number and date of the tutorial for reference.